I rarely touch iptables, so every time I do I have to look up the commands again. This cheat-sheet is a reminder for “bare-metal” iptables (nothing else managing the firewall; I don’t address UFW, NFT, Firewalld in this post).
Read this first #
Any change to the iptables ruleset we manually do with the iptables command, won’t persist reboots and are only stored in memory. This is great because we can safely lock ourselves out or make mistakes and we only need to reboot the box, but it requires additional steps to actually save them. More details on Persistence
on this blog post.
Important
- These steps assume that iptables is the only firewall manager running (no
firewalld,ufw, or nativenftablesservice). If another manager is enabled, it may overwrite or ignore the rules described here.- If the box already runs any of the above mentioned, treat their CLI as the source of truth. Making manual changes to iptables could be a bad idea and complicate our day.
- If your machine uses IPv6, then mirror your rules with ip6tables or disable IPv6 if you truly don’t need it.
Sanity check:
systemctl is-active firewalld | if it’s active, use firewalld, don’t touch iptables.
ufw status | If it’s active, use ufw commands, don’t touch iptables.
iptables -V shows nf_tables | Our commands are already translated into nftables; mixing raw nft CLI edits on the same box can still lead to surprises.
- Check with
systemctl is-active nftablesIf it is, then use nftables, not iptables.
Quick one:
systemctl --type=service --state=running | egrep -i 'firewall|ufw|nft'
Notes on Public Cloud Servers:
- Most of our server’s network filtering would be done in Cloud native firewalls (The most immediate to our machines would be Security Groups in AWS, for example), which cover most common ingress, but host rules may still be needed for egress control and advanced cases, like flow control over VPN, overlay networks, etc. In which cases the traffic wouldn’t pass through our “external” network interface and Cloud Firewalling would be insufficient.
Command Anatomy #
iptables [-t table] <COMMAND> CHAIN [match criteria] -j POLICY
Filters: Default and Custom chains #
Default table is filter (INPUT, FORWARD, OUTPUT). Order matters: first matching rule wins.
Command Verbs: Append vs Insert vs Replace #
| Action | Flag | Effect |
|---|---|---|
| Append | -A CHAIN ... |
Adds rule at the end of the chain. Evaluated last. |
| Insert | -I CHAIN [pos] ... |
Adds rule at the top (or given position). Evaluated earlier. |
| Replace | -R CHAIN <num> |
Replaces chain <num (See commands in next section to identify numbers) |
Where CHAIN is by default either INPUT, OUTPUT and FORWARD. We can create custom chains, to control the network flow, although that’s rarely used. |
Policy Verbs: Reject vs Accept vs Drop #
| Policy | Action |
|---|---|
| REJECT | Send TCP-RST (or ICMP-unreachable) |
| DROP | Silently discard, no response |
| ACCEPT | Let the packet through |
| RETURN | When matched, continue on the main chain (Rarely used, similar to return functionality in programming functions) |
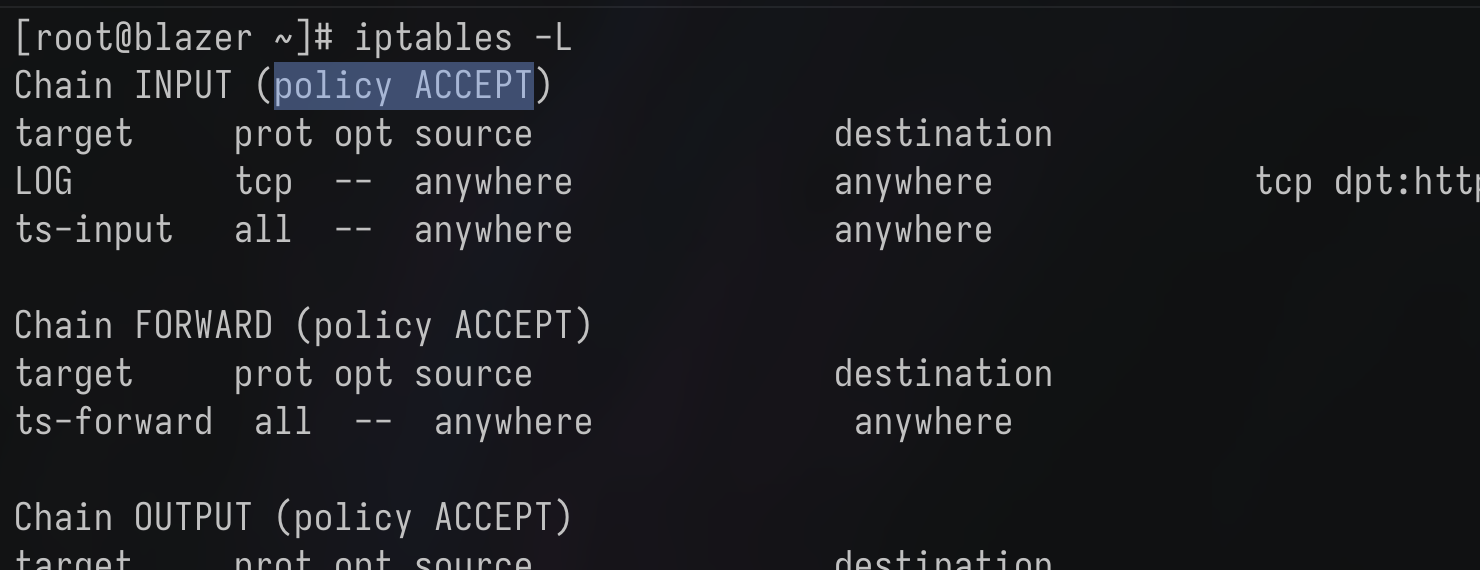
Watch out for the default chain’s policy. In the following screenshot example, the default INPUT chain’s policy is ACCEPT, which means it’ll fallback to ACCEPT everything that didn’t match any rule (Which can leave our box vulnerable if we don’t explicitly block unwanted traffic):
To change the default policy, we can use -P flag:
iptables -P INPUT REJECT
So everything that doesn’t match any of our rules, will get a TCP RST response.
Examples:
Basic rule: Append to our INPUT chain, an allow list for TCP on port 22. By default it assumes the source and destination are 0.0.0.0/0 (“Anywhere”). Make sure your default policy is not ACCEPT, because that would make this rule unsafe.
iptables -A INPUT -p tcp --dport 22 -j ACCEPT
- Specify network interface with
-i(for example-i eth0) - Specify source IPs/CIDR with
-s(For example-s 192.168.1.20or-s 192.168.1.0/24)
Display Rules with Counters & Line Numbers #
The following should be ran as sudo (Regular users cannot interact with iptables)
# Full view, numeric, with packet/byte counts
iptables -L -v -n --line-numbers

# Exact byte counts (no K/M abbreviations)
iptables -L -v -n -x

# Print then zero counters
iptables -L -v -n -Z

# Or simply
iptables -L
Fields
pkts — packets matched since last zero.
bytes — bytes matched since last zero.
Delete Rules #
# By position
iptables -D INPUT 3

# By exact match
iptables -D INPUT -p tcp --dport 22 -j ACCEPT
Reset Packet/Byte Counters #
iptables -Z            # all chains
iptables -Z INPUT 2    # specific rule
Combine with -L to print and reset in one go.
On Logging: Bytes/Packets vs. Full Syslog log #
By default, iptables already “logs” bytes/packet counters, and they get reset by reboots (or manual resets, obviously). Note that this is only a header summary, not a full packet capture.
If we want additional syslog logging per source IP, for example, we can add rules to use this pattern:
sudo iptables -I INPUT 1 \
     -p udp --dport 514 \
     -m limit --limit 5/second \
     -j LOG --log-prefix "UDP_MONITOR_"
“INSERT to our INPUT rule, a logging mechanism to report to syslog (journald), every packet coming via UDP, to our port 514, with a limit of 5 per second (So we don’t flood our syslog). the log prefix is just for identification (But it’s very important)”
And we can “scrape” this logs with journald:
# See the full log:
sudo journalctl -k --since "60 seconds ago"  | grep UDP_MONITOR_

# Extract only client IPs:
sudo journalctl -k --since "60 seconds ago"  | grep UDP_MONITOR_ | sed -n 's/.*SRC=\([0-9.]*\).*/\1/p'
And even sort and uniq depending on our use case or purpose.
Save / Restore / Persist #
Default iptables commands:

- Back up our current ruleset to a file:
Note: .v4 extension stands for IPv4 and it’s a common nomenclature. It has nothing to do with versioning
iptables-save   > /etc/iptables/rules.v4
# Or any other backup ruleset file we want
- Restore a “good state” TO MEMORY; THIS WON’T MAKE THEM PERSISTENT
iptables-restore < /etc/iptables/rules.v4
Persistence #
Apparently, we need iptables-persistent or iptables-services to make our rules persistent (Those are basically wrappers for iptables that do the backup & restore behind the scenes to simplify our lives).
Debian Linux #
sudo apt install iptables-persistent
Which installs the netfilter-persistent service. We can systemctl start and enable it.
sudo systemctl enable netfilter-persistent
Save our current rules:
sudo netfilter-persistent save (Which autosaves to /etc/iptables/rules.v4)
sudo netfilter-persistent reload
We can also restore again from manual saves by:
iptables-restore < /etc/iptables/my-rules
and netfilter-persistent save and reload again.
RHEL #
yum install -y iptables-services
Which is another helper script. A wrapper that does iptables-save and iptables-restore for us.
Good to know:
- This installs
iptablesas an IPv4 systemd service (And anip6tablesas an IPv6 one) → We need tosystemctl start iptables&&systemctl enable iptables.iptables-servicesis just a wrapper for iptables, which means it has a/etc/sysconfig/iptablesfile with rulesets, which gets passed in toiptables-restoreat boot, and this enables persistence.
sudo service iptables save → And this will basically override the /etc/sysconfig/iptables file
Because iptables-service uses/reads a single, regular iptables file, we can back up our current desired rulesets:
cp /etc/sysconfig/iptables /etc/sysconfig/iptables.prod
cp /etc/sysconfig/iptables /etc/sysconfig/iptables.test